Skip to content

Posts tagged ubuntu

Infrastructure notes, practical guides, and updates from 8Labs.

Artikel blog tersedia dalam bahasa Inggris. Buka versi asli bahasa Inggris.

RSS feed

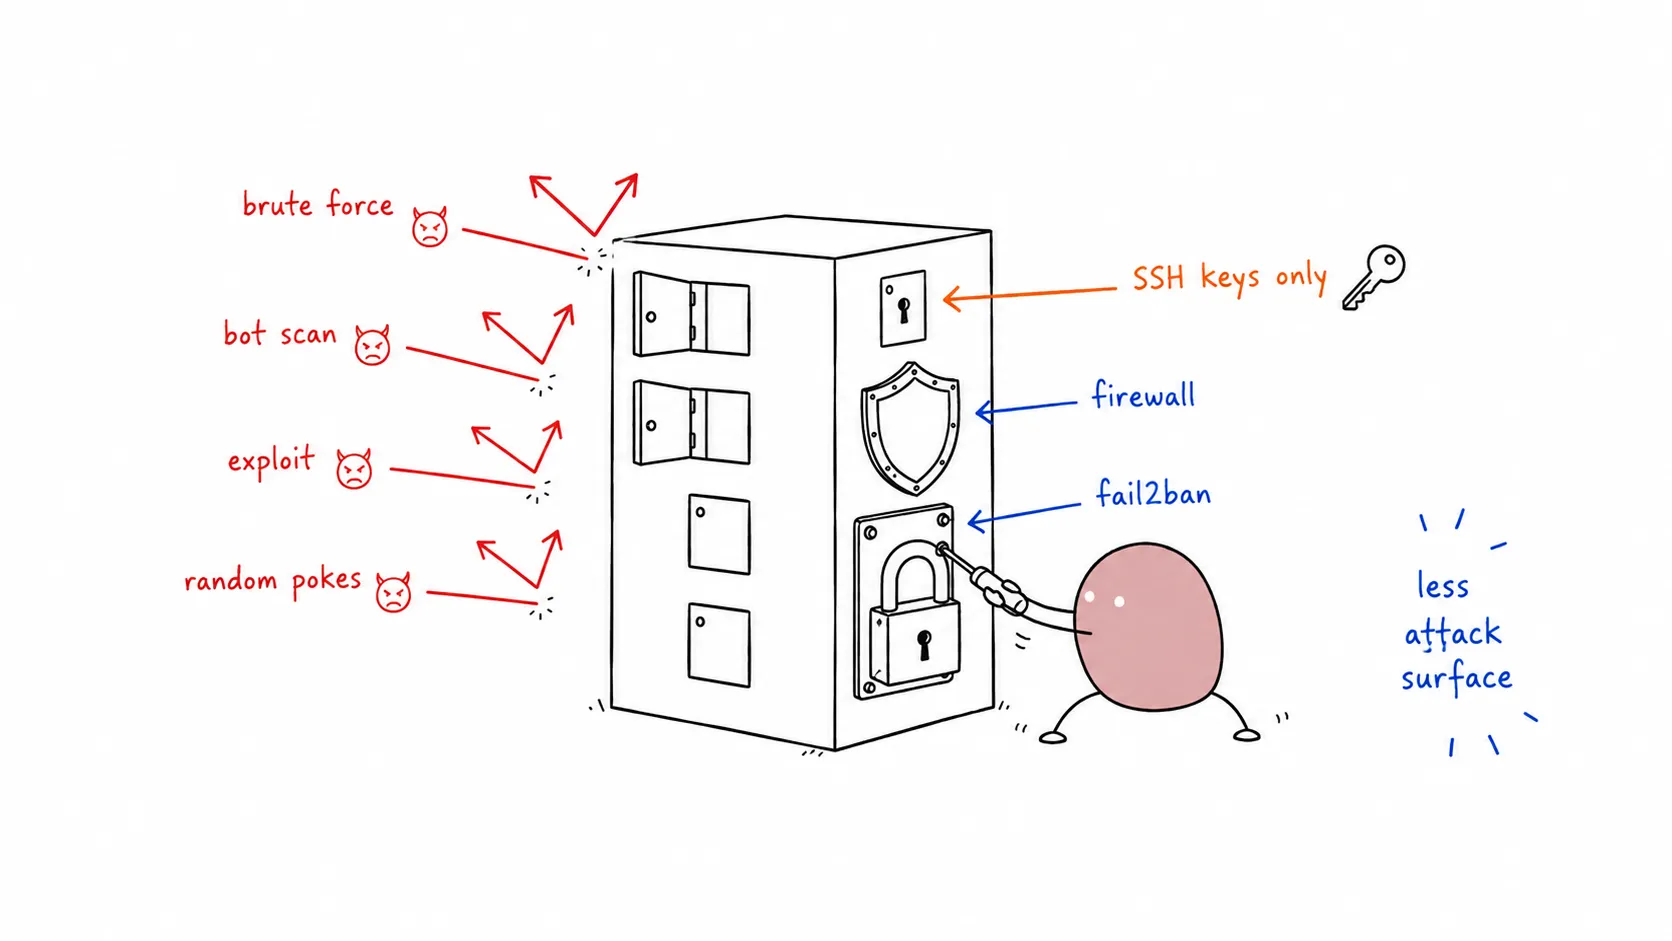
Ubuntu Server Hardening - A Comprehensive Security Guide

Securing your Ubuntu server is essential whether you’re running a production web server, a homelab service, or a cloud instance. This guide covers the essential steps to harden your Ubuntu Server 22.04/24.04 LTS installation, following security best practices and CIS benchmarks.

Prerequisites

  • Ubuntu Server 22.04 LTS or 24.04 LTS (fresh installation preferred)
  • Root or sudo access
  • SSH access to the server
  • Backup of critical data (always backup before making system changes)

Phase 1: Initial System Updates

Update System Packages

Start with a fully updated system to patch known vulnerabilities:

sudo apt update && sudo apt upgrade -y
sudo apt autoremove -y
sudo apt autoclean

Configure Automatic Security Updates

Enable unattended-upgrades for automatic security patches:

sudo apt install -y unattended-upgrades
sudo dpkg-reconfigure -plow unattended-upgrades

Verify the configuration:

cat /etc/apt/apt.conf.d/50unattended-upgrades | grep -A5 "Unattended-Upgrade::Allowed-Origins"

Phase 2: Secure SSH Access

Changing from port 22 reduces automated attack attempts:

sudo nano /etc/ssh/sshd_config

Find and modify:

Port 2222

Disable Root Login

Prevent direct root access via SSH:

sudo nano /etc/ssh/sshd_config

Set:

PermitRootLogin no

Disable Password Authentication (Use SSH Keys Only)

⚠️ WARNING: Ensure you have SSH key access configured before disabling passwords!

sudo nano /etc/ssh/sshd_config

Set:

PasswordAuthentication no
PubkeyAuthentication yes

Restrict SSH to Specific Users

Allow only specific users or groups:

sudo nano /etc/ssh/sshd_config

Add:

AllowUsers yourusername
# OR
AllowGroups ssh-users

Apply SSH Changes

Restart SSH service:

sudo systemctl restart sshd

⚠️ IMPORTANT: Keep your current SSH session open and test a new connection before closing!

Phase 3: Firewall Configuration (UFW)

Install and Enable UFW

sudo apt install -y ufw
sudo ufw default deny incoming
sudo ufw default allow outgoing

Configure Firewall Rules

Allow your custom SSH port (if changed):

sudo ufw allow 2222/tcp comment 'SSH custom port'

Or if using default SSH:

sudo ufw allow 22/tcp comment 'SSH'

Allow common services (adjust as needed):

# HTTP/HTTPS (for web servers)
sudo ufw allow 80/tcp comment 'HTTP'
sudo ufw allow 443/tcp comment 'HTTPS'

# WireGuard VPN
sudo ufw allow 51820/udp comment 'WireGuard'

# DNS
sudo ufw allow 53/tcp comment 'DNS'
sudo ufw allow 53/udp comment 'DNS'

Enable UFW

sudo ufw enable
sudo ufw status verbose

Phase 4: Install and Configure Fail2ban

Fail2ban protects against brute-force attacks by banning IPs with suspicious activity.

Installation

sudo apt install -y fail2ban

Create Custom Configuration

Create a local configuration file:

sudo nano /etc/fail2ban/jail.local

Add the following configuration:

[DEFAULT]
# Ban IP for 1 hour after 3 failed attempts within 10 minutes
bantime = 3600
findtime = 600
maxretry = 3
backend = systemd

# Enable email notifications (optional)
# destemail = your-email@example.com
# sender = fail2ban@your-server
# action = %(action_mwl)s

[sshd]
enabled = true
port = 2222,22
filter = sshd
logpath = /var/log/auth.log
maxretry = 3
bantime = 3600

# Protect additional services
[nginx-http-auth]
enabled = false

[nginx-noscript]
enabled = false

[nginx-botsearch]
enabled = false

[php-url-fopen]
enabled = false

Start Fail2ban

sudo systemctl enable --now fail2ban
sudo fail2ban-client status
sudo fail2ban-client status sshd

Phase 5: User and Permission Management

Create a Non-Root User (If Not Done)

sudo adduser yourusername
sudo usermod -aG sudo yourusername

Configure Password Policies

Install password quality checking:

sudo apt install -y libpam-pwquality
sudo nano /etc/security/pwquality.conf

Set strong password requirements:

minlen = 12
minclass = 3
maxrepeat = 2
dcredit = -1
ucredit = -1
ocredit = -1
lcredit = -1

Lock Unused Accounts

# List all users
awk -F: '$3 >= 1000 && $1 != "nobody" {print $1}' /etc/passwd

# Lock unused accounts
sudo passwd -l username

Phase 6: Disable Unnecessary Services

List Running Services

sudo systemctl list-units --type=service --state=running

Disable Common Unused Services

# Disable unnecessary services (adjust based on your needs)
sudo systemctl disable --now cups    # Printing (if not needed)
sudo systemctl disable --now avahi-daemon  # mDNS (if not needed)

Phase 7: File Permissions and Security

Secure Sensitive Files

# Secure SSH keys
sudo chmod 600 /etc/ssh/ssh_host_*_key
sudo chmod 644 /etc/ssh/ssh_host_*_key.pub

# Secure shadow file
sudo chmod 640 /etc/shadow

# Secure sudo configuration
sudo chmod 440 /etc/sudoers

Check for SUID/SGID Files

Find files with special permissions:

sudo find / -perm -4000 -type f 2>/dev/null
sudo find / -perm -2000 -type f 2>/dev/null

Phase 8: Network Security

Disable IPv6 (If Not Needed)

sudo nano /etc/sysctl.conf

Add:

net.ipv6.conf.all.disable_ipv6 = 1
net.ipv6.conf.default.disable_ipv6 = 1
net.ipv6.conf.lo.disable_ipv6 = 1

Apply:

sudo sysctl -p

Configure Kernel Parameters

sudo nano /etc/sysctl.conf

Add security hardening:

# IP Spoofing protection
net.ipv4.conf.all.rp_filter = 1
net.ipv4.conf.default.rp_filter = 1

# Ignore ICMP broadcast requests
net.ipv4.icmp_echo_ignore_broadcasts = 1

# Disable source packet routing
net.ipv4.conf.all.accept_source_route = 0
net.ipv4.conf.default.accept_source_route = 0

# Ignore send redirects
net.ipv4.conf.all.accept_redirects = 0
net.ipv4.conf.default.accept_redirects = 0
net.ipv4.conf.all.secure_redirects = 0
net.ipv4.conf.default.secure_redirects = 0

# Disable ICMP redirects
net.ipv4.conf.all.send_redirects = 0
net.ipv4.conf.default.send_redirects = 0

# Disable log martians
net.ipv4.conf.all.log_martians = 1

# Disable IPv6 router solicitations
net.ipv6.conf.all.accept_ra = 0
net.ipv6.conf.default.accept_ra = 0

Apply:

sudo sysctl -p

Phase 9: Install Security Tools

Install and Configure AIDE (Intrusion Detection)

sudo apt install -y aide
sudo aideinit
sudo cp /var/lib/aide/aide.db.new /var/lib/aide/aide.db

Install Lynis (Security Auditing)

sudo apt install -y lynis
sudo lynis audit system

Install Rootkit Detectors

sudo apt install -y rkhunter chkrootbot
sudo rkhunter --update
sudo rkhunter --check

Install Log Monitoring

sudo apt install -y logwatch

Phase 10: Backup and Recovery

Configure Automated Backups

Create a backup script:

sudo nano /usr/local/bin/system-backup.sh
#!/bin/bash
# System backup script
DATE=$(date +%Y%m%d_%H%M%S)
BACKUP_DIR="/backup/system"
mkdir -p $BACKUP_DIR

# Backup critical configuration
tar czf $BACKUP_DIR/config_backup_$DATE.tar.gz /etc /home /var/spool/cron /var/lib/dpkg

# Keep only last 7 backups
ls -t $BACKUP_DIR/*.tar.gz | tail -n +8 | xargs -r rm

echo "Backup completed: $DATE"

Make executable:

sudo chmod +x /usr/local/bin/system-backup.sh

Add to Cron

sudo crontab -e

Add daily backup at 2 AM:

0 2 * * * /usr/local/bin/system-backup.sh >> /var/log/system-backup.log 2>&1

Phase 11: Ongoing Monitoring

Install and Configure Auditd

sudo apt install -y auditd audispd-plugins
sudo systemctl enable --now auditd

Monitor Failed Login Attempts

grep "Failed password" /var/log/auth.log
grep "Accepted password" /var/log/auth.log

Review UFW Logs

sudo tail -f /var/log/ufw.log

Phase 12: Secure Shared Memory

Shared memory is a common attack vector. While it’s efficient for process communication, it can be exploited for privilege escalation or arbitrary code execution.

Harden /run/shm

Add the following to /etc/fstab to mount shared memory with restrictive options:

echo "tmpfs /run/shm tmpfs defaults,noexec,nosuid,nodev 0 0" | sudo tee -a /etc/fstab

Explanation:

  • noexec — Prevents execution of binaries
  • nosuid — Ignores set-user-identifier bits
  • nodev — Prevents interpretation of device files

Apply changes:

sudo mount -o remount /run/shm
# Or reboot:
sudo reboot

Verify the mount:

mount | grep shm
# Should show: tmpfs on /run/shm type tmpfs (rw,nosuid,nodev,noexec,relatime)

Quick Security Checklist

Use this checklist to verify your hardening:

  • System fully updated with automatic security updates enabled
  • SSH root login disabled
  • SSH password authentication disabled (keys only)
  • SSH port changed from default (optional)
  • UFW firewall enabled with minimal allowed ports
  • Fail2ban installed and running
  • Non-root user created for administration
  • Password policies configured
  • Unnecessary services disabled
  • Shared memory secured (noexec,nosuid,nodev)
  • Automatic backups configured
  • Security auditing tools installed

Security Audit Cheatsheet

Quick commands to audit your server’s security:

User & Permission Auditing

# Find users with UID 0 (should only be root)
awk -F: '($3 == 0) {print}' /etc/passwd

# List all user accounts
awk -F: '{print $1}' /etc/passwd

# Find users without passwords (empty password field)
awk -F: '($2 == "") {print $1}' /etc/shadow

# Check for users with sudo access
getent group sudo

# Find SUID/SGID files (potential privilege escalation)
find / -perm -4000 -type f 2>/dev/null
find / -perm -2000 -type f 2>/dev/null

Network & Connection Auditing

# Check listening ports
ss -tulnp

# Check established connections
ss -tu np state established

# Review firewall status
sudo ufw status verbose

# Check for open ports from outside
# (Run from another machine)
nmap -sV your-server-ip

Log & Activity Auditing

# Recent login attempts
last -a | head -20

# Failed SSH login attempts
grep "Failed password" /var/log/auth.log | tail -20

# Successful SSH logins
grep "Accepted" /var/log/auth.log | tail -20

# Fail2ban status
sudo fail2ban-client status sshd

# UFW blocked attempts
sudo grep UFW /var/log/ufw.log | tail -20

System & File Auditing

# Disk usage
df -h

# Check for world-writable directories
find / -type d -perm -002 ! -path "/proc/*" ! -path "/sys/*" 2>/dev/null

# List recently modified files (last 24 hours)
find /etc /var -mtime -1 -type f 2>/dev/null

# Check AIDE database (if installed)
sudo aide --check

# Run Lynis audit
sudo lynis audit system --quick

One-Click Hardening Script

For quick deployment or automation, here’s a comprehensive hardening script. Review before running!

#!/bin/bash
# Ubuntu Server Hardening Script
# WARNING: Review before running. Test in non-production first!

set -e

# Colors for output
RED='\033[0;31m'
GREEN='\033[0;32m'
YELLOW='\033[1;33m'
NC='\033[0m' # No Color

echo -e "${YELLOW}=== Ubuntu Server Hardening Script ===${NC}"
echo -e "${RED}WARNING: Review this script before running!${NC}"
echo ""

# 1. System Updates
echo -e "${GREEN}[1/8] Updating system packages...${NC}"
apt update && apt upgrade -y
apt autoremove -y
apt autoclean

# 2. Install security tools
echo -e "${GREEN}[2/8] Installing security tools...${NC}"
apt install -y ufw fail2ban unattended-upgrades libpam-pwquality

# 3. Configure automatic updates
echo -e "${GREEN}[3/8] Configuring automatic security updates...${NC}"
dpkg-reconfigure -plow unattended-upgrades

# 4. UFW Firewall
echo -e "${GREEN}[4/8] Configuring UFW firewall...${NC}"
ufw default deny incoming
ufw default allow outgoing
ufw allow 22/tcp comment 'SSH'
ufw --force enable

# 5. SSH Hardening (preserves current session)
echo -e "${GREEN}[5/8] Hardening SSH configuration...${NC}"
cp /etc/ssh/sshd_config /etc/ssh/sshd_config.backup.$(date +%Y%m%d)

# Disable root login
sed -i 's/^#\?PermitRootLogin.*/PermitRootLogin no/' /etc/ssh/sshd_config

# Disable password authentication
sed -i 's/^#\?PasswordAuthentication.*/PasswordAuthentication no/' /etc/ssh/sshd_config
sed -i 's/^#\?PubkeyAuthentication.*/PubkeyAuthentication yes/' /etc/ssh/sshd_config

# Restart SSH (non-disruptive)
systemctl reload sshd || systemctl restart sshd

# 6. Fail2ban
echo -e "${GREEN}[6/8] Configuring Fail2ban...${NC}"
cat > /etc/fail2ban/jail.local <<EOF
[DEFAULT]
bantime = 3600
findtime = 600
maxretry = 3

[sshd]
enabled = true
port = ssh
filter = sshd
logpath = /var/log/auth.log
EOF

systemctl enable fail2ban
systemctl restart fail2ban

# 7. Secure Shared Memory
echo -e "${GREEN}[7/8] Securing shared memory...${NC}"
if ! grep -q "/run/shm" /etc/fstab; then
    echo "tmpfs /run/shm tmpfs defaults,noexec,nosuid,nodev 0 0" >> /etc/fstab
    mount -o remount /run/shm
fi

# 8. Kernel Security Parameters
echo -e "${GREEN}[8/8] Applying kernel security parameters...${NC}"
cat >> /etc/sysctl.conf <<EOF

# Security hardening
net.ipv4.conf.all.rp_filter = 1
net.ipv4.conf.default.rp_filter = 1
net.ipv4.icmp_echo_ignore_broadcasts = 1
net.ipv4.conf.all.accept_source_route = 0
net.ipv4.conf.default.accept_source_route = 0
net.ipv4.conf.all.accept_redirects = 0
net.ipv4.conf.default.accept_redirects = 0
net.ipv4.conf.all.send_redirects = 0
net.ipv4.conf.default.send_redirects = 0
EOF

sysctl -p

echo ""
echo -e "${GREEN}=== Hardening Complete! ===${NC}"
echo "Backup SSH config: /etc/ssh/sshd_config.backup.*"
echo ""
echo -e "${YELLOW}IMPORTANT:${NC}"
echo "1. Keep your current SSH session open"
echo "2. Test new SSH connection in another terminal"
echo "3. If locked out, restore from backup:"
echo "   cp /etc/ssh/sshd_config.backup.* /etc/ssh/sshd_config"
echo "   systemctl restart sshd"
echo ""
echo "Run 'lynis audit system' to verify hardening."

Save and run:

# Download and review
wget https://your-domain.com/harden.sh -O ubuntu-harden.sh
nano ubuntu-harden.sh  # Review before running!

# Make executable and run
chmod +x ubuntu-harden.sh
sudo ./ubuntu-harden.sh

Testing Your Security

After hardening, test your configuration:

  1. Verify SSH access: Try connecting with your key (not password)
  2. Test Fail2ban: Attempt failed logins and check ban status
  3. Check firewall: Use nmap from another machine to scan open ports
  4. Run Lynis audit: Review the hardening index score
# From another machine, scan your server
nmap -sV -O your-server-ip

Conclusion

This guide provides a solid security baseline for Ubuntu servers. Remember that security is an ongoing process:

  • Monitor logs regularly for suspicious activity
  • Keep system updated with security patches
  • Review firewall rules periodically
  • Audit user accounts and remove unused ones
  • Test backups to ensure they work

⚠️ IMPORTANT: Always test changes in a non-production environment first. Keep a backup of working configurations before making changes.

Additional Resources

References


Security is a journey, not a destination. Stay vigilant!

Installing Omakub on a Proxmox Virtual Machine

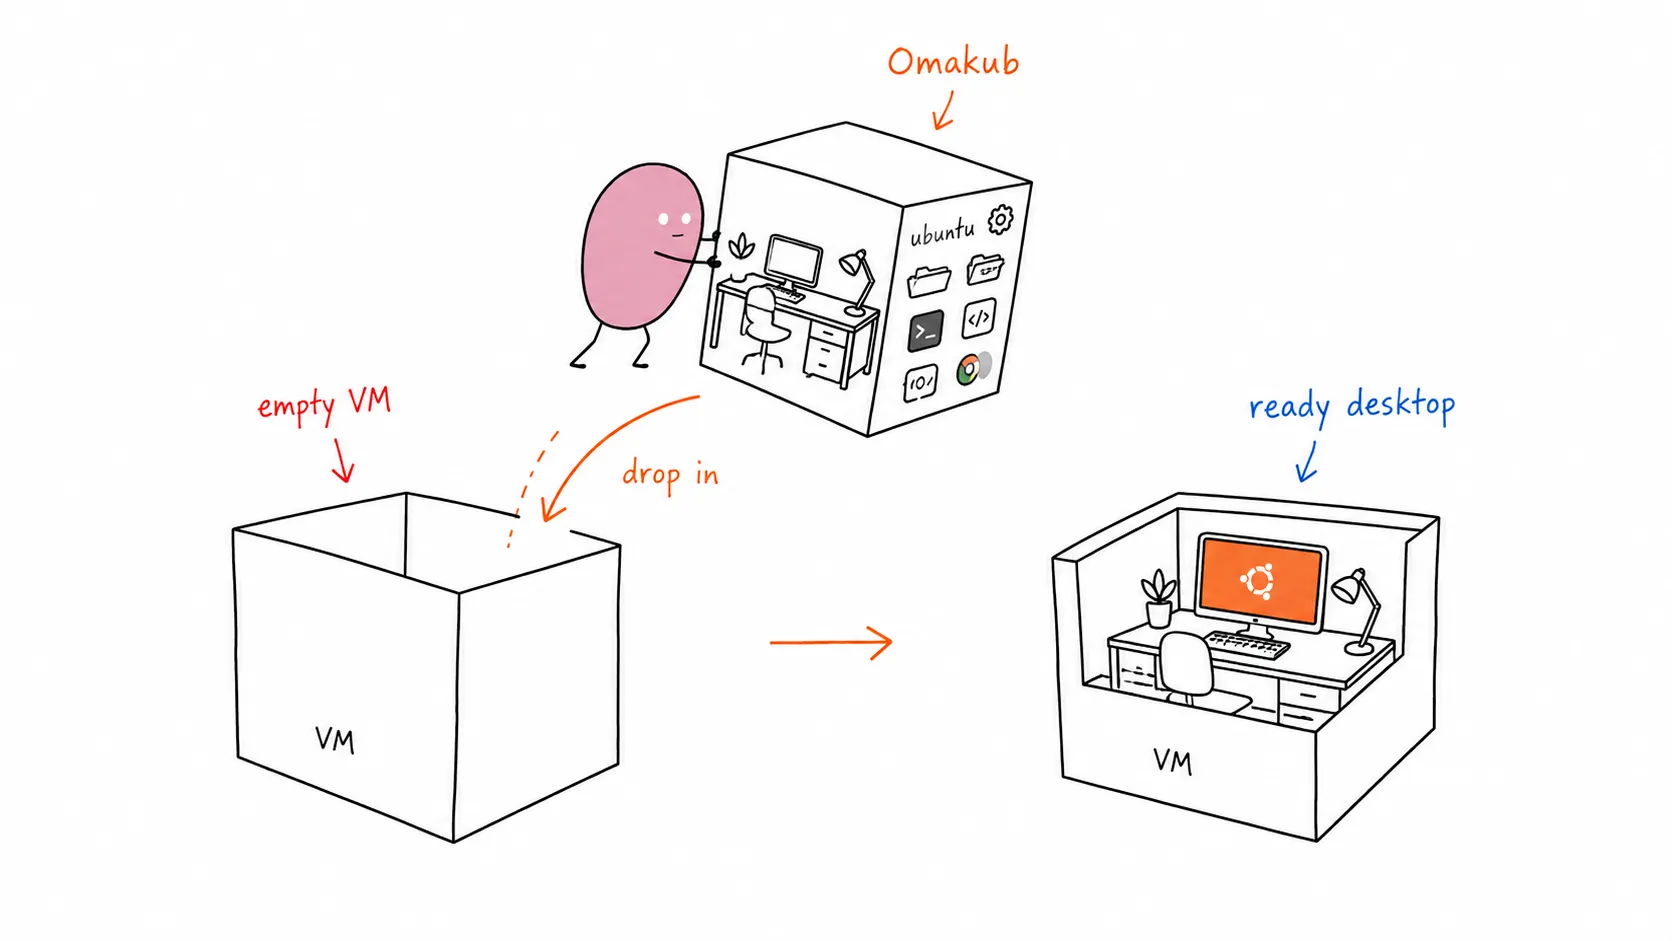
I recently found myself in a common homelab dilemma: I needed a dedicated machine for a jumphost and remote development environment, but all my spare hardware was already tied up with my Proxmox server running other services. So, I decided to leverage my existing Proxmox setup and install Omakub inside a virtual machine.

Omakub, based on Ubuntu, provides a clean and efficient workspace, perfect for keeping my main PC clutter-free while still having a powerful Linux environment at my fingertips. This guide will walk you through setting up a fresh Ubuntu 24.04 VM in Proxmox and then installing Omakub.

VM Specification

For this setup, I allocated the following resources to my Proxmox VM:

  • VCPU: 8
  • RAM: 16 GB
  • Storage: 512 GB SSD

Step by Step: Ubuntu 24.04 Installation (Proxmox VM)

  1. Download Ubuntu 24.04 ISO: First, grab the official Ubuntu 24.04 Desktop ISO from the Ubuntu website. https://releases.ubuntu.com/24.04/

  2. Create a New VM in Proxmox: Follow the standard Proxmox procedure to create a new virtual machine.

    • Mount the downloaded Ubuntu ISO as a CD/DVD drive.
    • Configure the VM with the specifications mentioned above (8 VCPU, 16 GB RAM, 512 GB SSD).
    • Ensure you select “Qemu Agent” in the VM options for better integration.
  3. Install Ubuntu 24.04: Boot the VM and proceed with a fresh installation of Ubuntu 24.04 Desktop. Follow the on-screen prompts to set up your user, timezone, etc.

Post-Installation Setup

Once Ubuntu is installed and you’ve rebooted into your fresh desktop, perform these crucial steps before installing Omakub:

  1. Update all repositories:

    sudo apt update && sudo apt upgrade -y

    If a reboot is requested after the update, go ahead and reboot your VM.

  2. Install essential tools:

    sudo apt install -y vim qemu-guest-agent openssh-server
  3. Enable and start services:

    sudo systemctl enable --now qemu-guest-agent
    sudo systemctl enable --now ssh

Enable Remote Desktop

After ensuring your system is updated and services are running, you can enable Remote Desktop for easier access.

  1. Open Settings > System > Remote Desktop.
  2. Toggle Remote Desktop to ON.
  3. For Remote Login, you can choose to set a specific port (the default RDP port is 3389).
  4. Set your desired username and password for remote access.

Now, you can test connecting to your Ubuntu VM using an RDP client. I use Microsoft Remote Desktop on my Mac.

Omakub Installation

Once you have successfully connected to your Ubuntu VM via RDP, you can proceed with the Omakub installation using their convenient one-line script.

Open a terminal in your Ubuntu VM and run:

wget -qO- https://omakub.org/install | bash

Follow the on-screen prompts to select your preferred options. The installation will take some time and will eventually request a reboot.

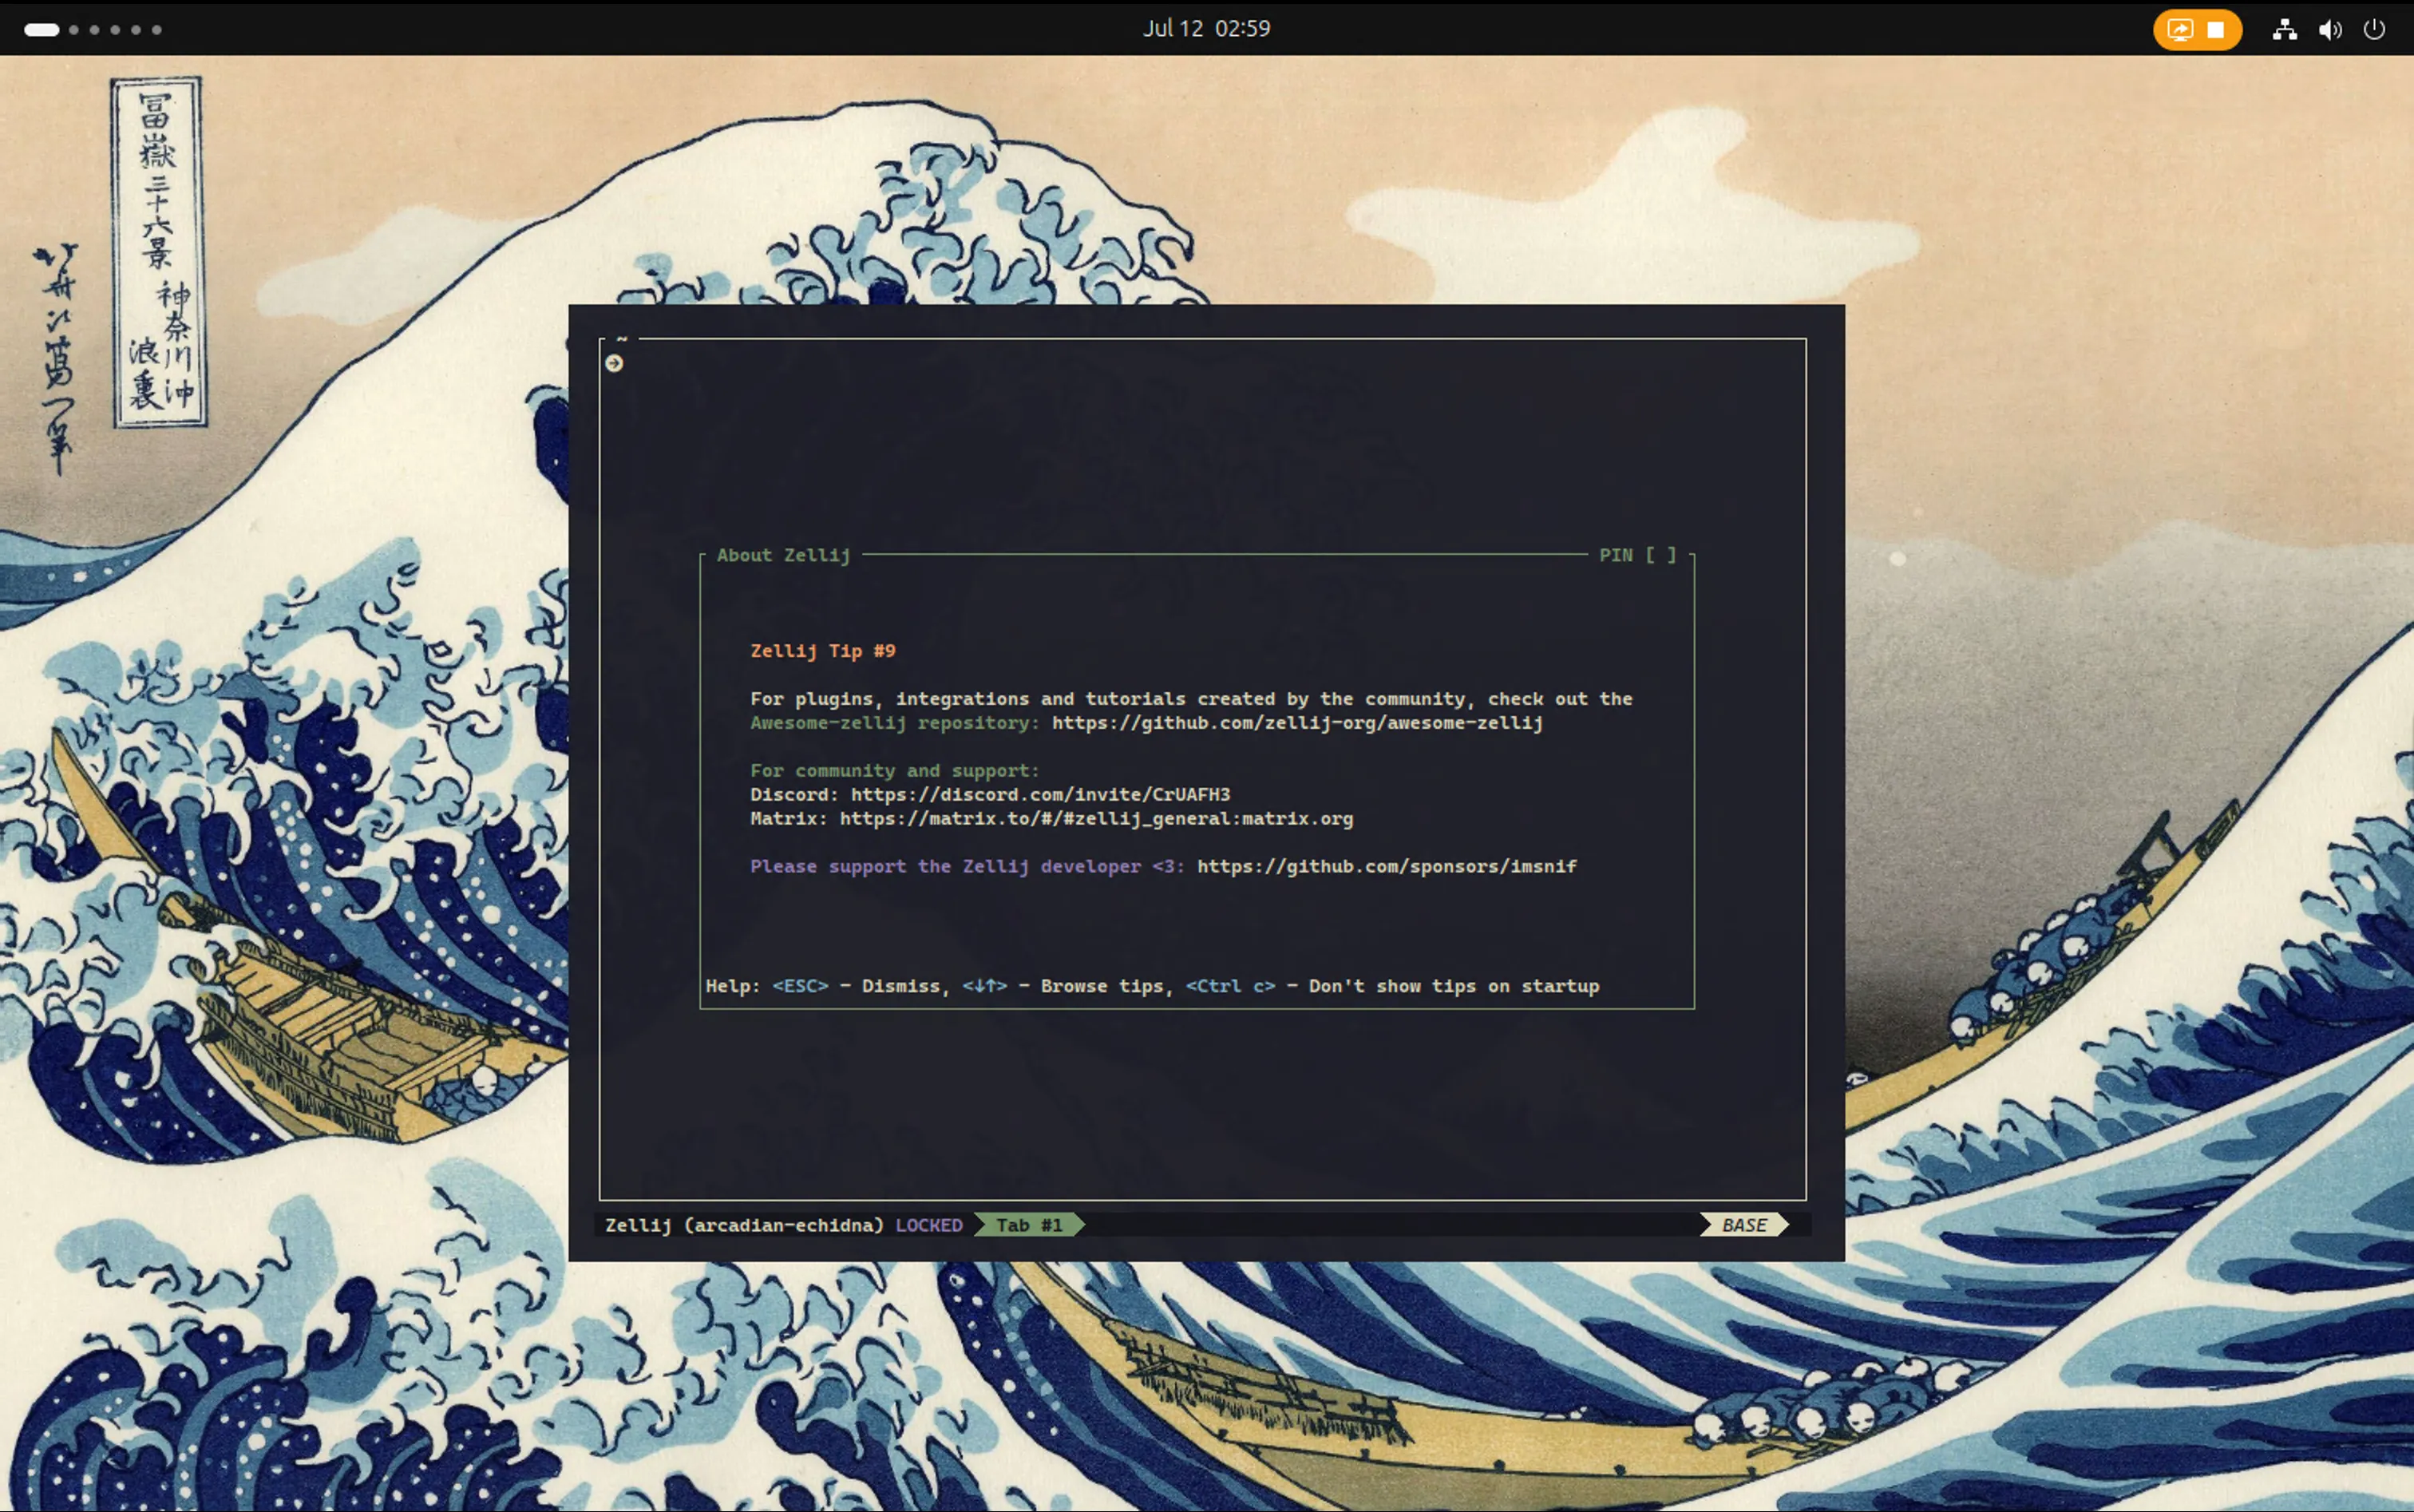
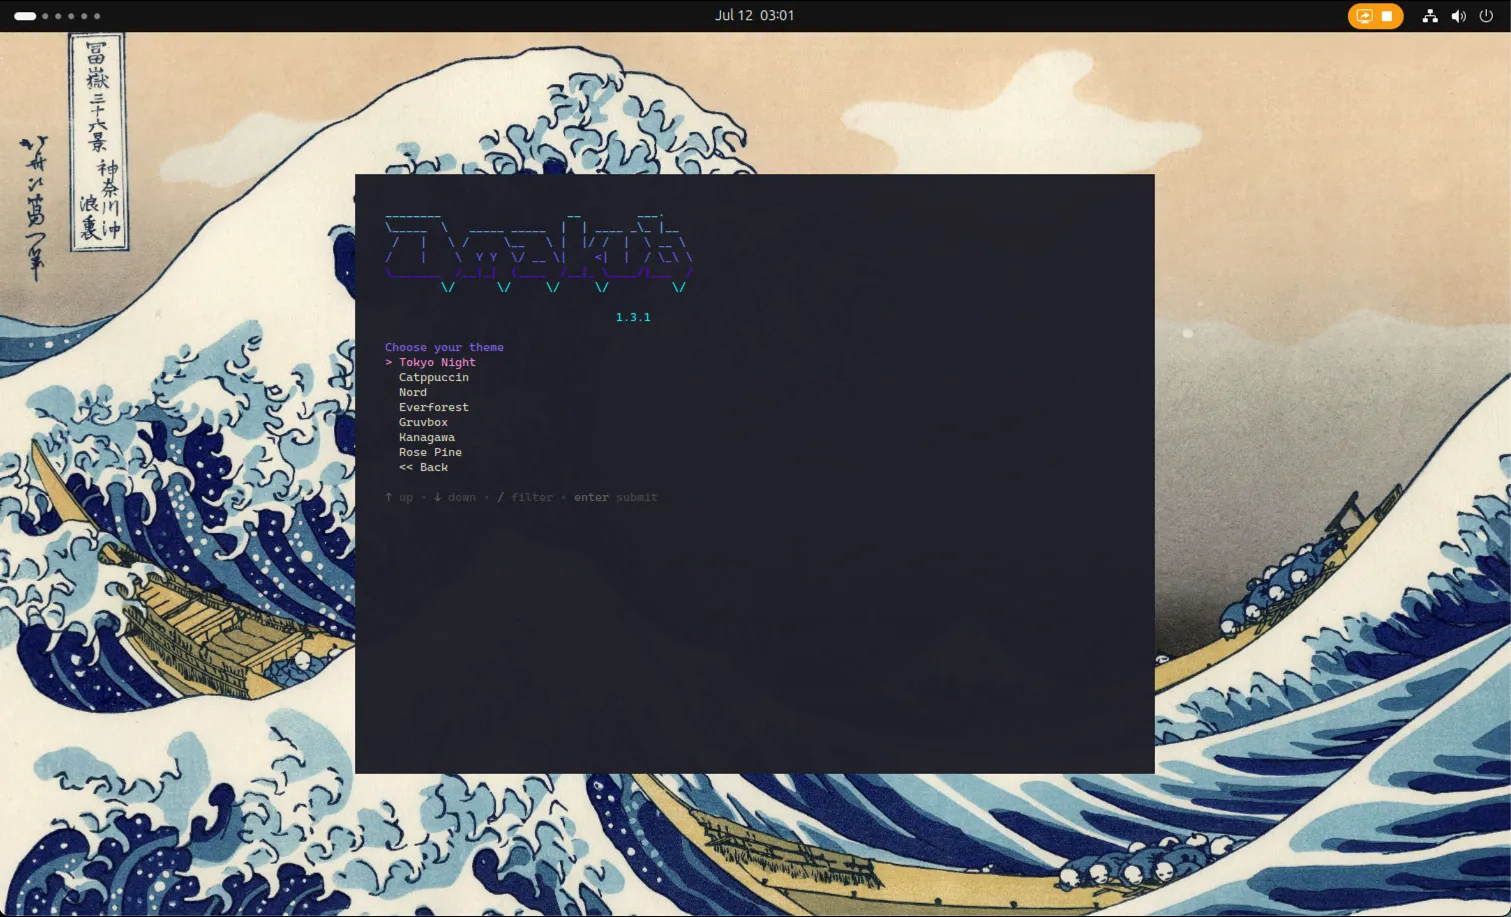
Terminal Landing Page

Post-Omakub Installation & Troubleshooting

After Omakub is installed and your VM has rebooted, try to connect again via RDP.

  • Xorg Session: Omakub uses Xorg. If you experience lagging or a black screen upon login, ensure you select “Ubuntu on Xorg” after entering your username and before typing your password. Look for a small gear icon (or similar) in the bottom right corner of the login screen to choose the session type.

  • RDP Black Screen Troubleshooting (macOS Microsoft Remote Desktop): If you encounter a black screen specifically when using Microsoft Remote Desktop on macOS, you might need to adjust the RDP connection file:

    1. Right-click on your existing connection in Microsoft Remote Desktop.
    2. Select “Export” to save the connection settings as an .rdp file.
    3. Open the saved .rdp file with a text editor.
    4. Locate the line:
      use redirection server name:i:0
    5. Change it to:
      use redirection server name:i:1
    6. Save the modified file.
    7. Import the edited file as a new connection in Microsoft Remote Desktop.

    For more details, you can refer to this Reddit thread: https://www.reddit.com/r/Ubuntu/comments/1csoi05/2404_cannot_connect_via_rdp/?utm_source=share&utm_medium=web3x&utm_name=web3xcss&utm_term=1&utm_content=share_button

Troubleshooting Keyboard Shortcuts (Super Key Conflicts)

A common issue when using Remote Desktop from macOS to a Linux VM (especially with Omakub) is that macOS’s system-level shortcuts can conflict with the VM’s shortcuts, particularly those involving the Super key (Cmd key on Mac). For example, Super+Space often triggers Spotlight on macOS instead of Omakub’s application launcher.

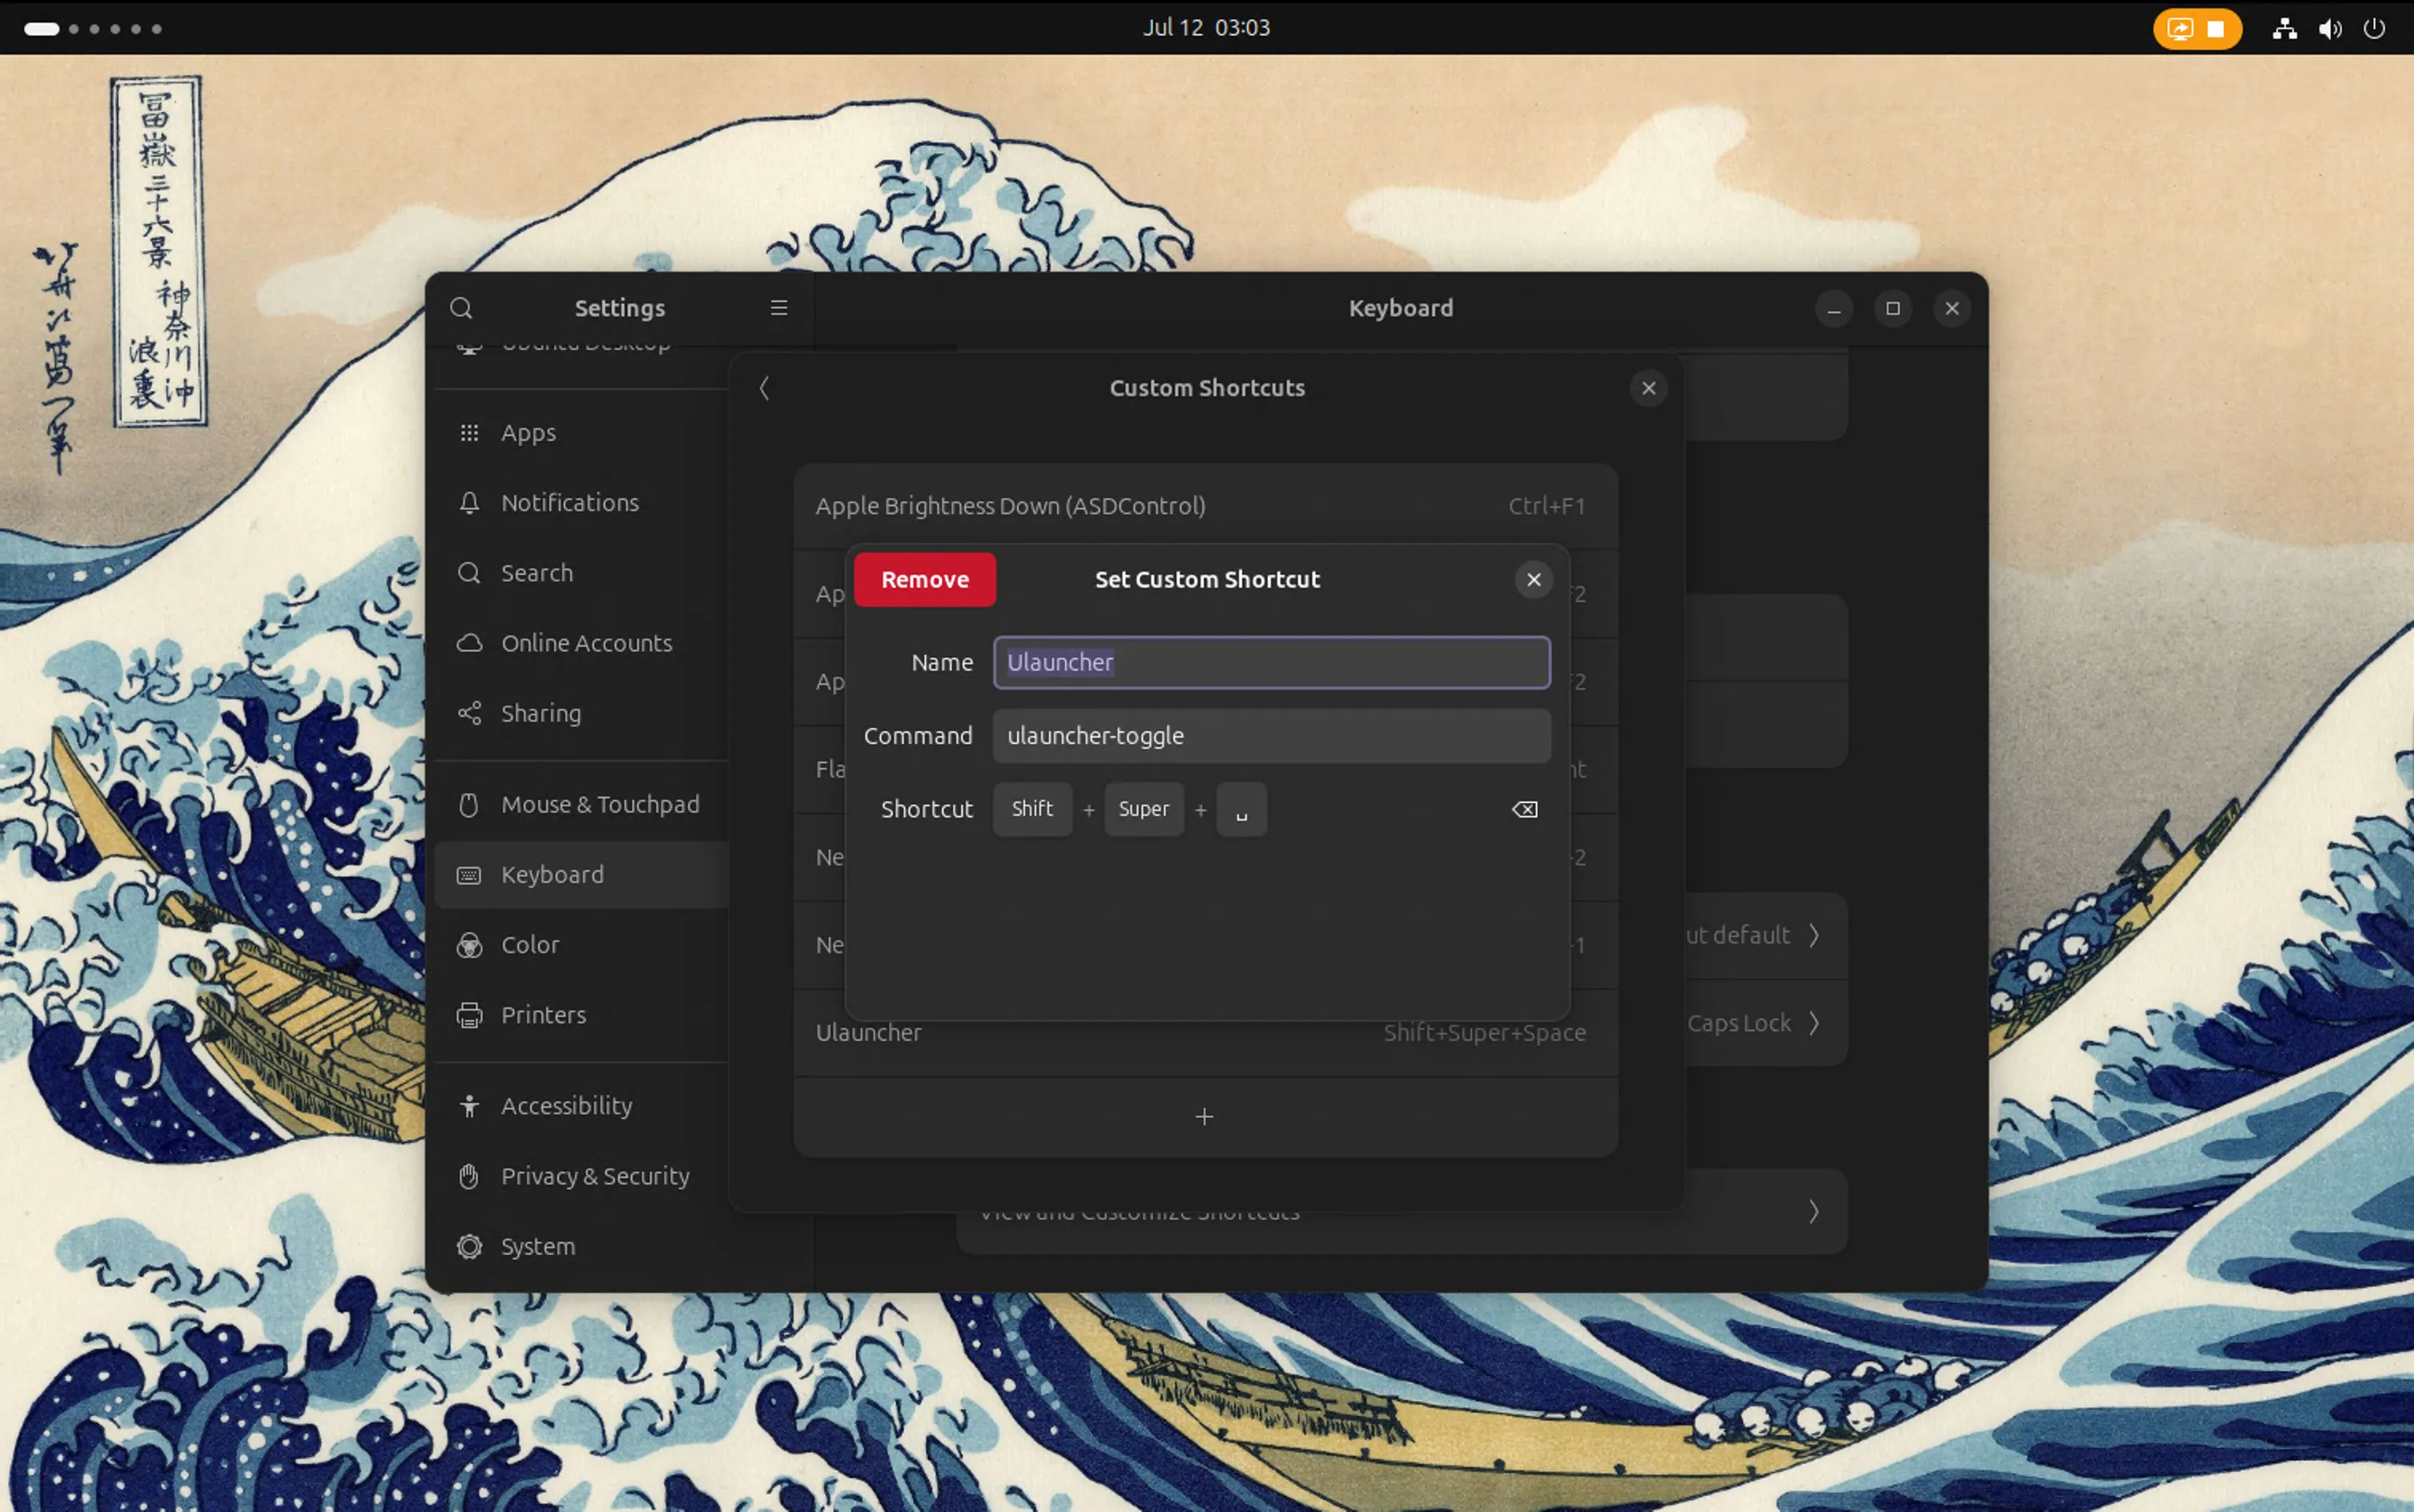
Shortcut Settings

To resolve this, you can adjust the hotkeys within Omakub to avoid conflicts:

  • Ulauncher (“Type app to launch”):

    • Original: Super + Space
    • New: Shift + Super + Space
    • You can find and modify this shortcut within Omakub’s settings, often under “Keyboard” or “Custom Shortcuts,” specifically looking for Ulauncher.
  • “See all apps” (System):

    • Original: Super + A
    • New: Shift + Super + A
  • “Close app” (Windows):

    • Original: Super + W
    • New: Shift + Super + W

By changing these keybindings in Omakub, you allow macOS to retain its system-level shortcuts while still having access to Omakub’s features with non-conflicting combinations.

Conclusion

You’ve now successfully installed Omakub on an Ubuntu 24.04 virtual machine within Proxmox! This setup provides a powerful and isolated environment for your jumphost and remote development needs, all while leveraging your existing homelab infrastructure. Enjoy your clean main PC and your new Omakub workspace!

Omakub Theme

References

Qemu and Virt-manager in macOS (Intel-based)

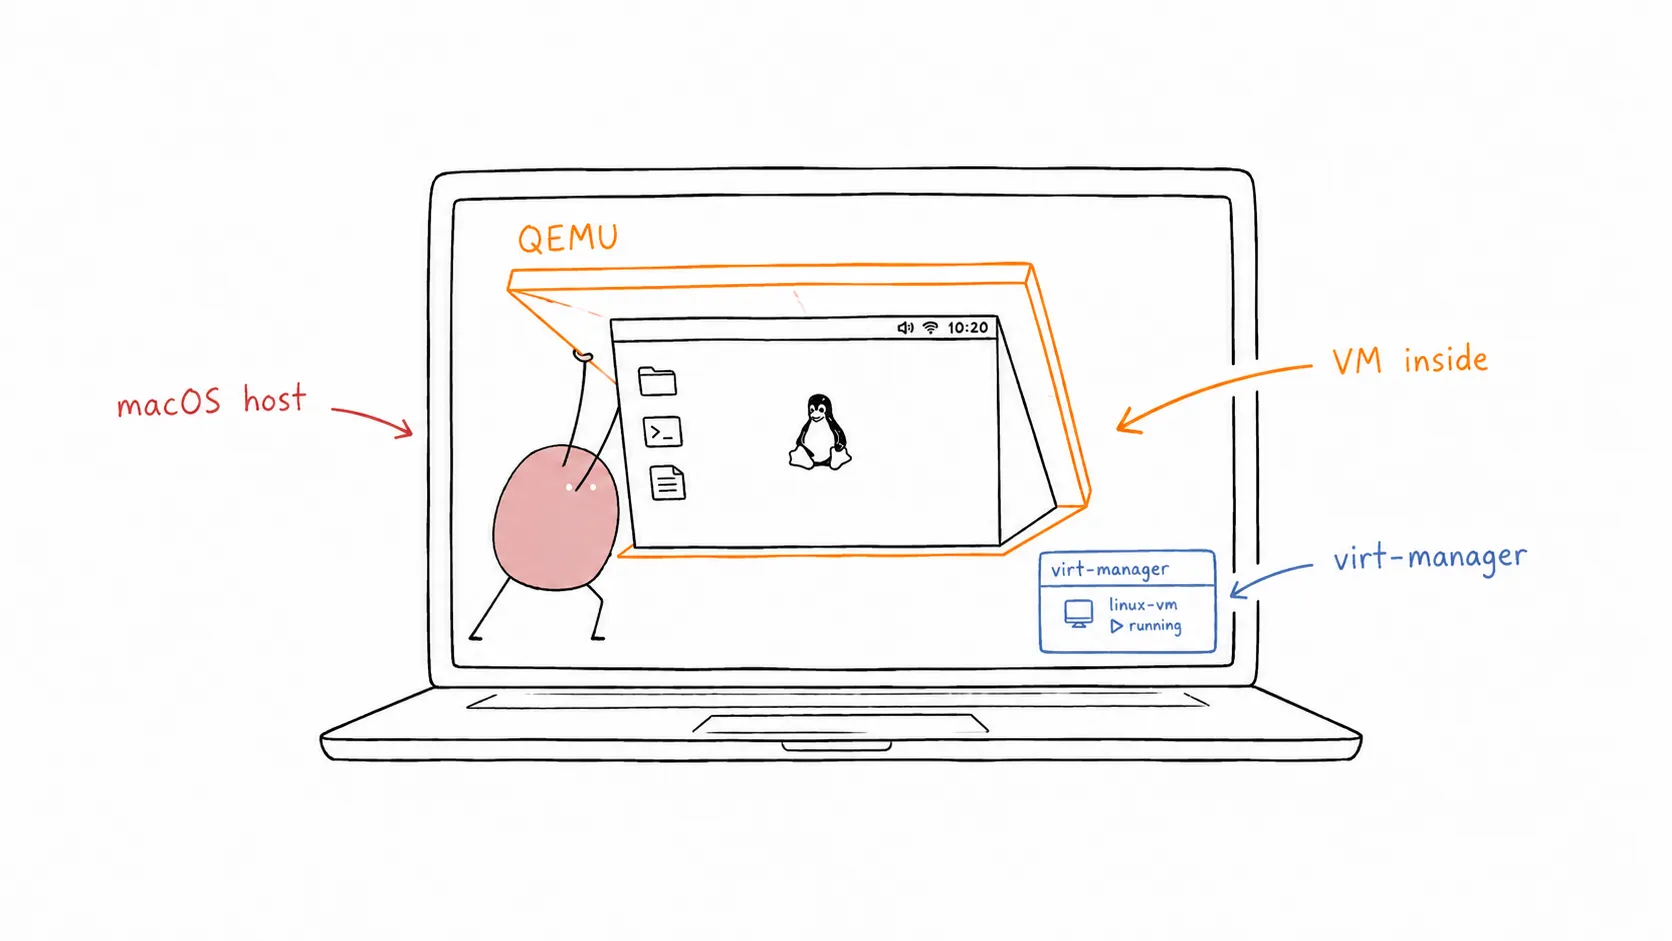
So, I found this old iMac (Retina 5K, 27-inch, 2017) lying around with pretty decent specs. I’m thinking of turning it into my dedicated x86 playground since my main machine is an M1 MacBook. First thing’s first: getting Qemu and Virt-manager up and running for some virtual machine action. Yeah, I know there are other VM solutions like VMware or VirtualBox, but I want to stay familiar with what’s common in enterprise environments (even if nobody’s running macOS in production, haha!).

Specification

iMac (Retina 5K, 27-inch, 2017)

  • Processor: 4.2 GHz Quad-Core Intel Core i7
  • Memory: 16 GB 2400 MHz DDR4
  • OS Version: Ventura 13.7.4 (22H420)

Step by Step: Qemu

  1. First, we need Homebrew to install everything.

    Get it here: https://brew.sh/

    /bin/bash -c "$(curl -fsSL <https://raw.githubusercontent.com/Homebrew/install/HEAD/install.sh>)"
  2. Now, let’s install Qemu itself.

    Check it out here: https://formulae.brew.sh/formula/qemu

    brew install qemu
  3. Verify the installation by checking the Qemu version.

    qemu-system-x86_64 --version

    Check qemu version

  4. Let’s get Ubuntu running with Qemu.

    1. Download the historical Ubuntu 24.04.2 desktop ISO used by this example. The publisher moved this image to its old-releases archive.

    2. Create a disk image using qemu-img. I’m making a 20GB image in the qcow2 format.

      qemu-img create -f qcow2 ubuntu-24.04.2-desktop-amd64.qcow2 20G
    3. Fire up the VM, booting from the ISO we just downloaded (mounted as a CD drive) and attaching the virtual disk we created.

      qemu-system-x86_64 \\
          -machine type=q35,accel=hvf \\
          -smp 2 \\
          -hda ubuntu-24.04.2-desktop-amd64.qcow2 \\
          -cdrom ./ubuntu-24.04.2-desktop-amd64.iso \\
          -m 4G \\
          -vga virtio \\
          -usb \\
          -device usb-tablet \\
          -display default,show-cursor=on

      Here’s a breakdown of what those flags actually mean:

      • qemu-system-x86_64: Tells QEMU we want to emulate a 64-bit Intel/AMD system.
      • machine type=q35,accel=hvf
        • type=q35: Sets the machine chipset to Q35, emulating a modern PC with PCI Express.
        • accel=hvf: Uses the Hypervisor Framework (HVF) for hardware acceleration on macOS. This makes things much faster!
      • smp 2: Gives the VM 2 CPU cores.
      • hda ubuntu-24.04.2-desktop-amd64.qcow2: Specifies the QCOW2 disk image as the primary hard drive.
      • cdrom ./ubuntu-24.04.2-desktop-amd64.iso: Mounts the ISO as a virtual CD-ROM for booting/installing.
      • m 4G: Allocates 4GB of RAM to the VM.
      • vga virtio: Uses a Virtio-based video card for better performance.
      • usb: Enables USB support.
      • device usb-tablet: Adds a virtual USB tablet for smoother mouse input.
      • display default,show-cursor=on: Makes sure the mouse cursor is visible.
    4. The VM should boot up from the ISO. Go ahead and install the OS to the virtual disk we created earlier.

    5. Once the installation is done, you can boot the VM without the ISO.

      qemu-system-x86_64 \\
          -machine type=q35,accel=hvf \\
          -smp 2 \\
          -hda ubuntu-24.04.2-desktop-amd64.qcow2 \\
          -m 4G \\
          -vga virtio \\
          -usb \\
          -device usb-tablet \\
          -display default,show-cursor=on

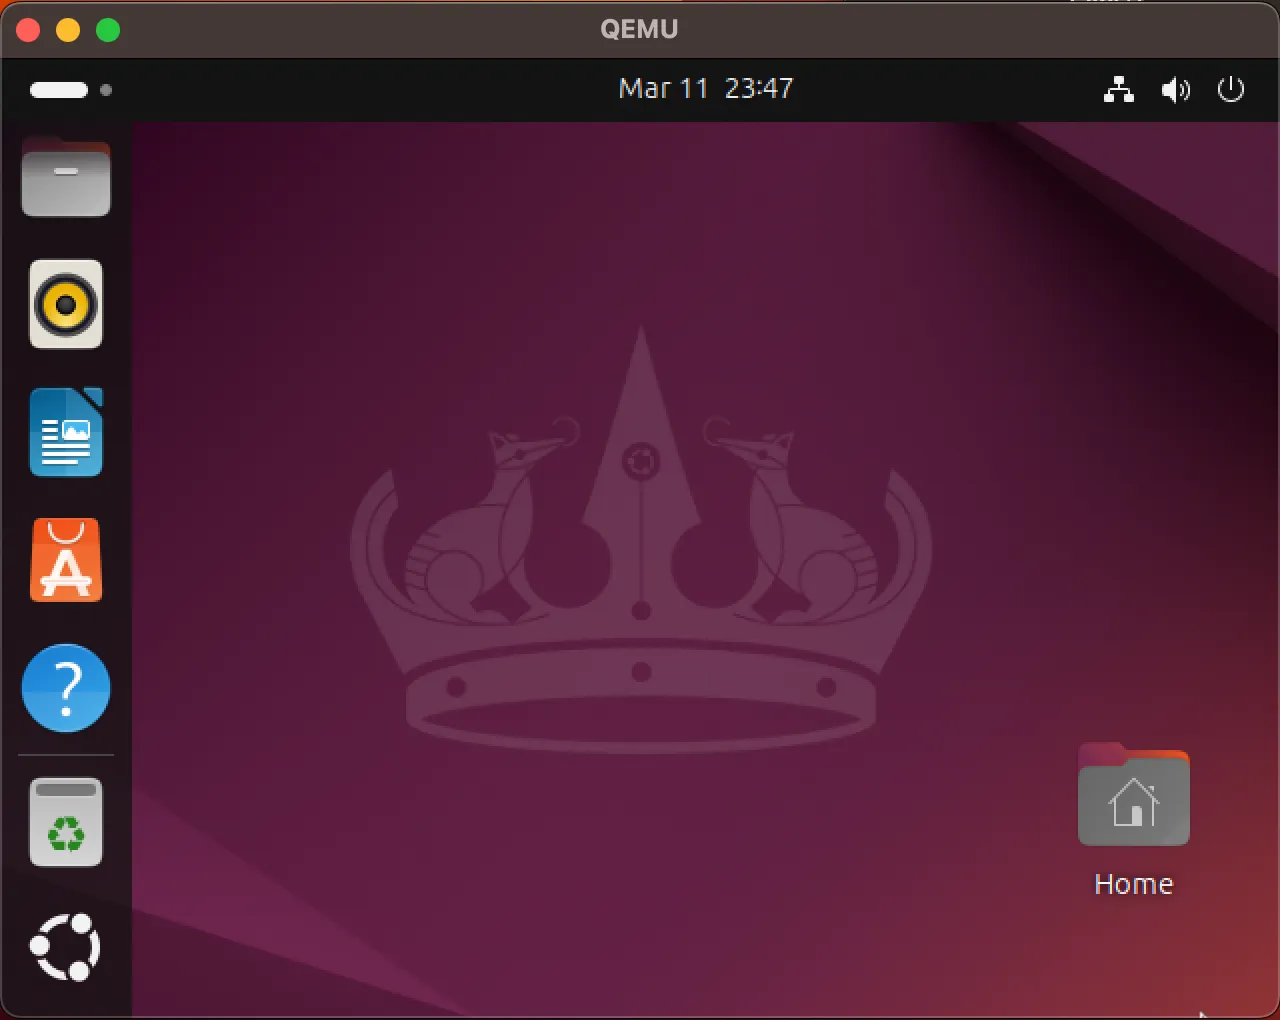
      Ubuntu Desktop VM in qemu

    6. To shut down the VM, do it cleanly from within the OS, or, if you’re feeling lazy, just hit Ctrl+C in the terminal (but I wouldn’t recommend it!).

Step by Step: Libvirt and Virt-manager

  1. Install libvirt.

    libvirt is a toolkit for managing virtualization platforms like Qemu, KVM, Xen, etc.

    Check it out here: https://formulae.brew.sh/formula/libvirt

    brew install libvirt
  2. Start the libvirt service.

    brew services start libvirt
  3. Install virt-manager. To make managing VMs easier, we’ll use virt-manager as a GUI.

    Check it out here: https://formulae.brew.sh/formula/virt-manager

    brew install virt-manager
  4. Start a virt-manager session.

    virt-manager -c "qemu:///session" --no-fork
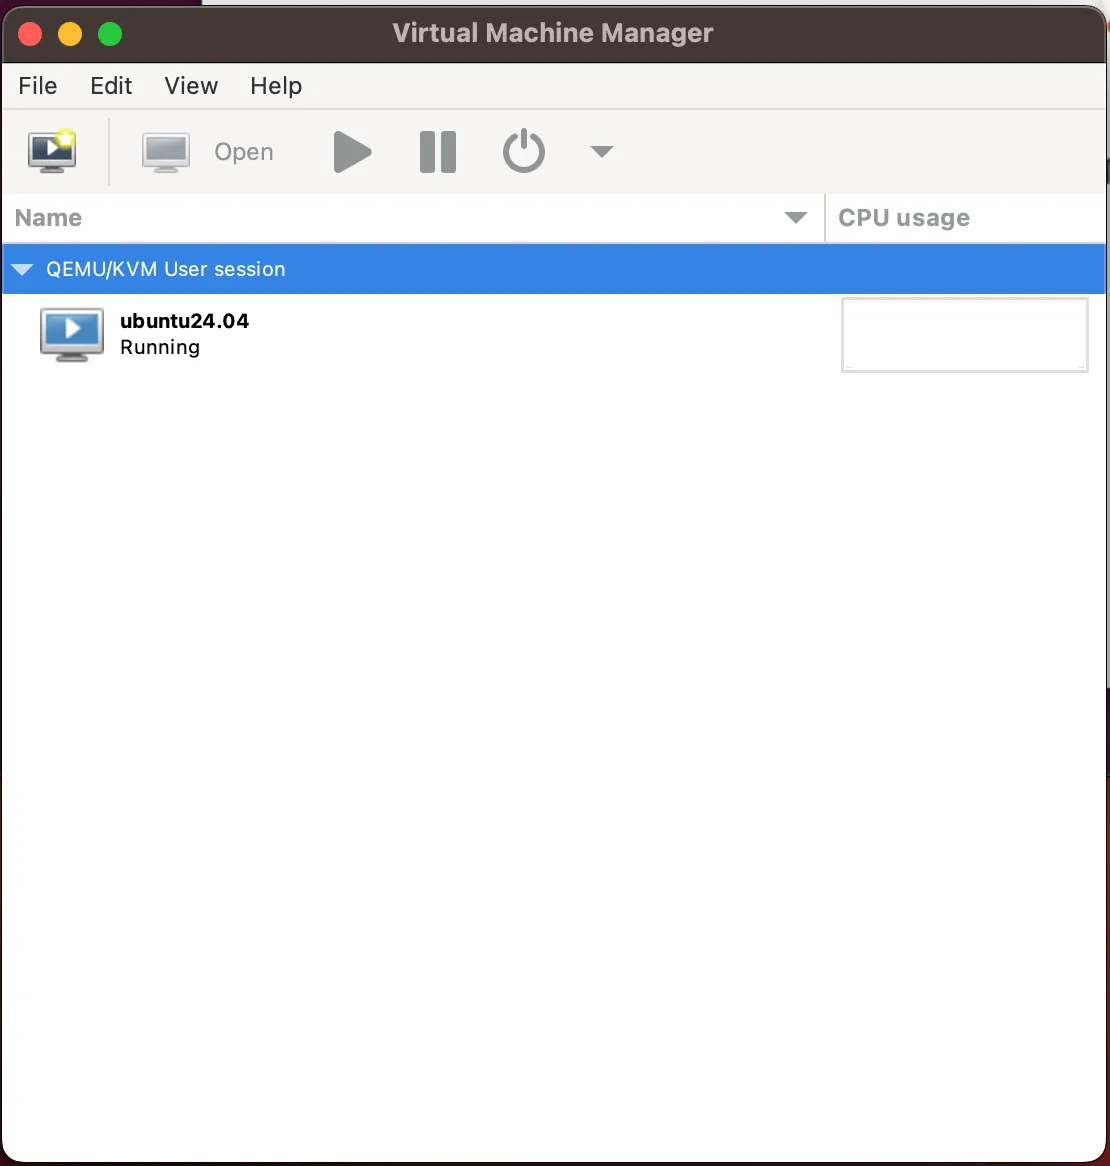
  5. Once the window pops up, you can install Ubuntu VMs and mess around.

    virt-manager window

Conclusion

So there you have it! Qemu, libvirt, and virt-manager all set up on macOS. It wasn’t too bad, right? Now you can spin up VMs to your heart’s content. This setup is pretty handy for testing different operating systems, playing around with software, or just generally tinkering without messing up your main system. Plus, getting familiar with these tools can be a real boost if you ever find yourself working with virtualization in a more “serious” environment. Happy virtualizing!

Reference

https://www.arthurkoziel.com/qemu-ubuntu-20-04/

https://www.arthurkoziel.com/running-virt-manager-and-libvirt-on-macos/

Setup Non HA Kubernetes using K3S

Last Update: 25 February 2025

K3S

Resources

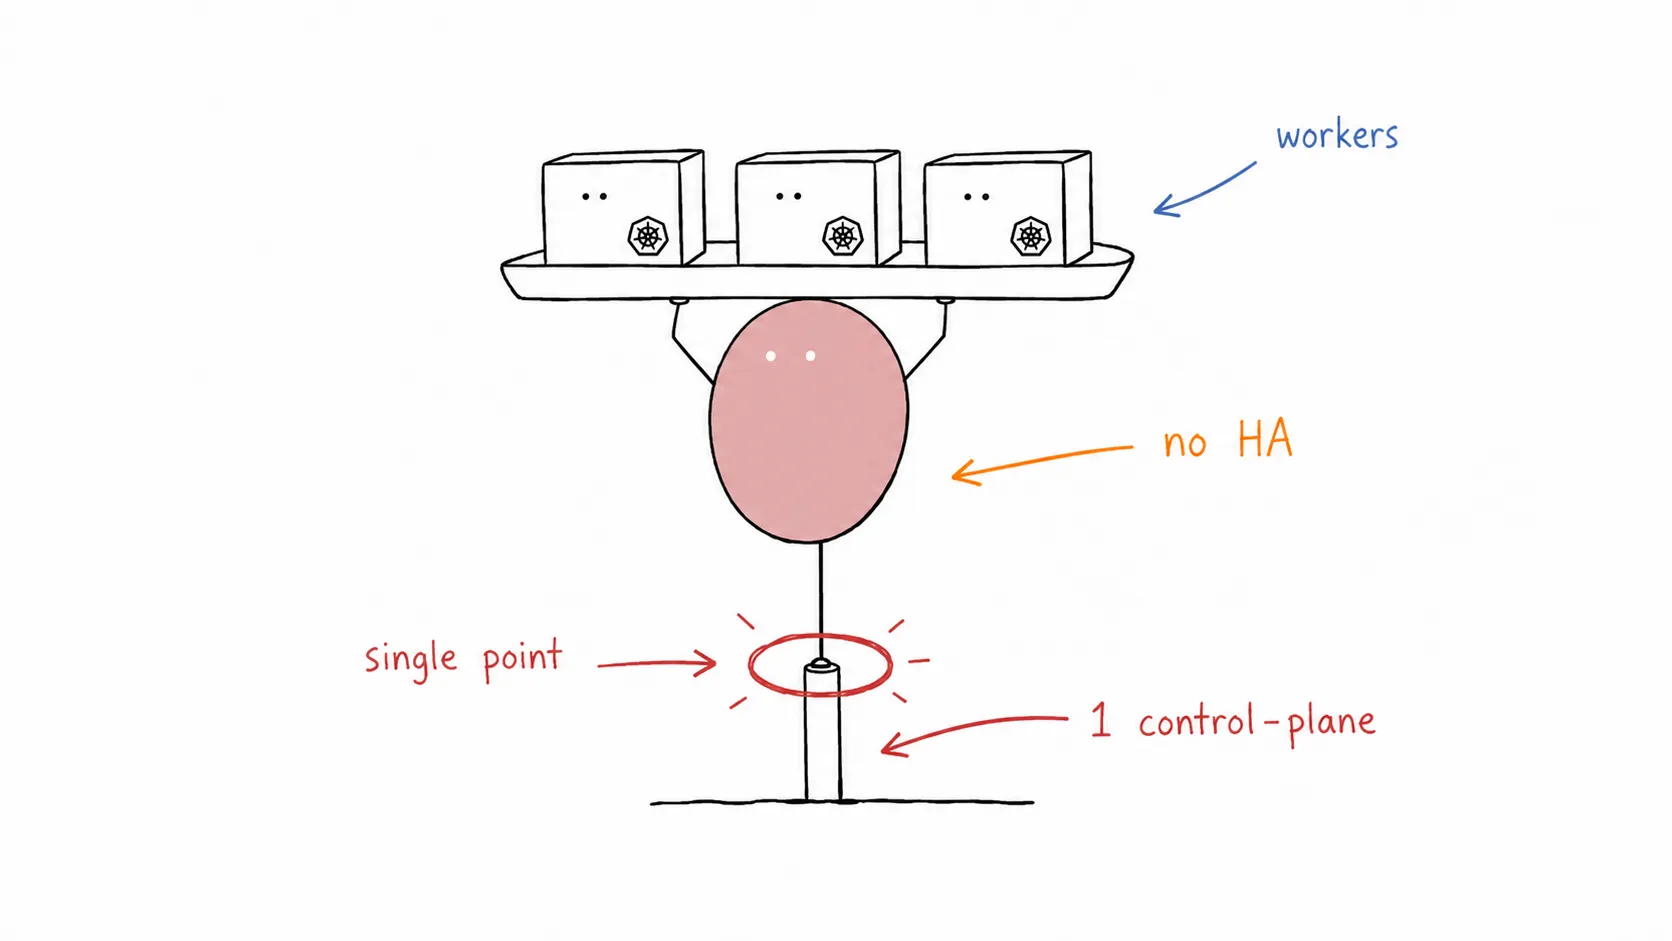
Non-HA Control Plan Setup and Configuration

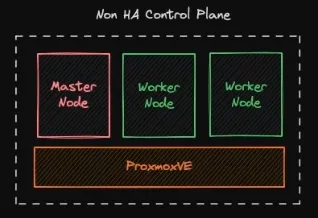
Non HA Control Plane Kubernetes

The implementation Scenario will be configured:

  • 1 Master Node
  • 2 Worker Node

These three nodes will be deployed in Proxmox VE, with each specification of node:

  • 4 vCPU
  • 16 GB of memory
  • 50 GB of storage
  • Ubuntu 20.04

Step by step

VM Setup

  1. Update and upgrade the package repository to the newest version.

    sudo apt update -y
    sudo apt upgrade -y
  2. (optional) rename and set /etc/host for each node became:

    1. Master node → kube-master-1
    2. Worker node → kube-worker-1, kube-worker-2
    #edit /etc/hosts and add this at the end of file (adjust ip address)
    10.0.2.200 kube-master-1
    10.0.2.199 kube-worker-1
    10.0.2.198 kube-worker-2
  3. Reboot to finalize the upgrade and apply the hostname.

  4. Install docker with this script (Docker: Install using the conveniencescript)

    curl -fsSL https://get.docker.com -o get-docker.sh
    sudo sh get-docker.sh
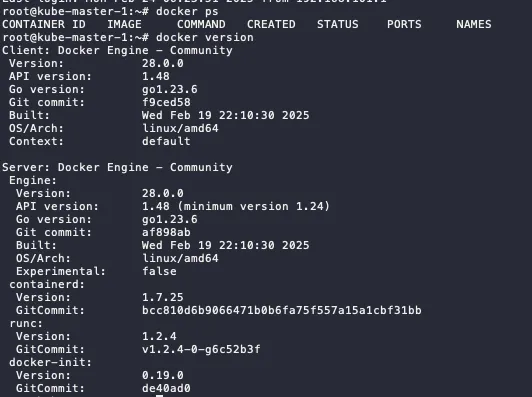
  5. Check docker command and version

    docker ps
    docker version

    Check Docker Version

Master Node Setup

  1. Defined the K3s token. Save this token and make sure this token is the same for all nodes

    export K3S_TOKEN=kubernetesdemo123
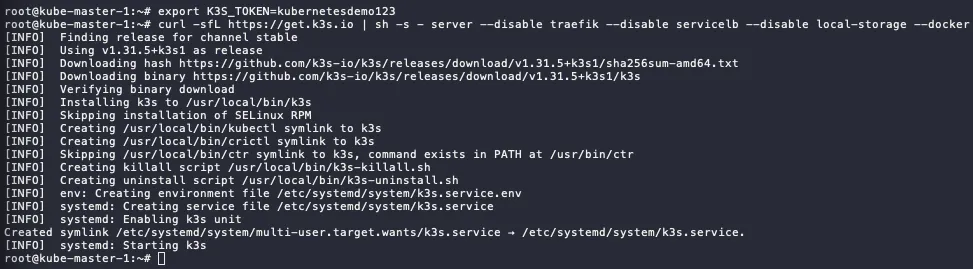
  2. The installation of master node, using this script:

    1. install the server as master node
    2. disable Traefik for ingress → will use Nginx ingress
    3. disable Servicelb → will use MetalLB
    4. disable local-storage → will use Ceph CSI
    5. declare to use docker
    curl -sfL https://get.k3s.io | sh -s - server --disable traefik --disable servicelb --disable local-storage --docker

    K3S Installation

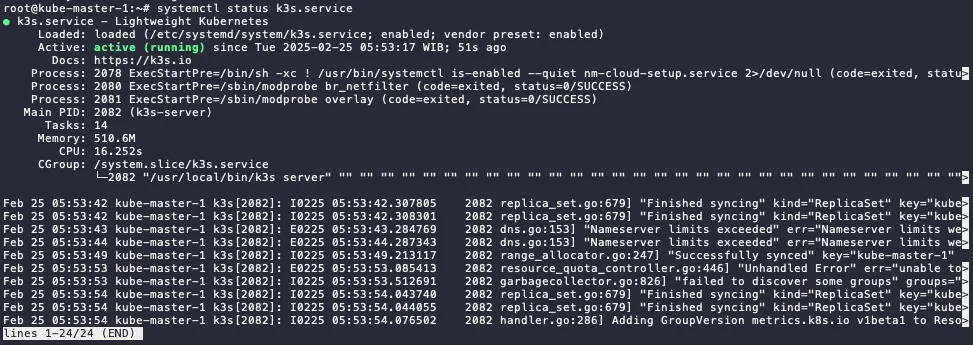
  3. Check the service status, make sure it is active

    systemctl status k3s.service

    K3S Master Node Status

  4. Check kubectl command. It will display 1 node only (which is the master node).

    kubectl get node

    Get Node Information using kubectl

    ⚠️ if the get error unable to read /etc/rancher/k3s/k3s.yml , you can fix with this step.

    mkdir .kube
    sudo cp /etc/rancher/k3s/k3s.yaml .kube/config.yaml
    sudo chown $USER:$GROUP .kube/config.yaml
    export KUBECONFIG=~/.kube/config.yaml

    or if you have not start the installation, you can add --write-config 644 in the end of the script, like this:

    curl -sfL https://get.k3s.io | sh -s - server --disable traefik --disable servicelb --disable local-storage --docker --write-config 644

Worker Node Setup

Do this step for all the worker node, in this scenario will be kube-worker-1 and kube-worker-2.

  1. Defined the K3s token. Use the same token as defined in master node.

    export K3S_TOKEN=kubernetesdemo123

    ⚠️ If you forget the token on the master node, you can check and on the master node on this file. Copy all the string.

    cat /var/lib/rancher/k3s/server/node-token
  2. The installation of worker nodes, using this script:

    1. install the server as worker node (agent)
    2. declare to use docker
    3. define the server endpoint to master node ip or domain
    curl -sfL https://get.k3s.io | sh -s - agent --docker --server https://kube-master-1:6443
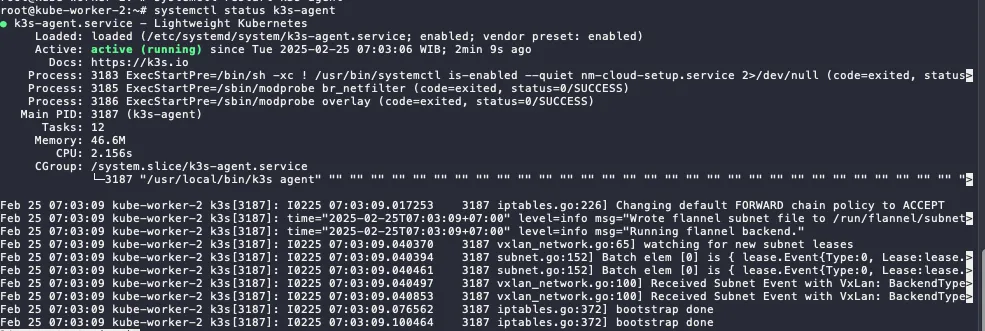
  3. Check the service in the worker nodes

    systemctl status k3s-agent.service

    K3S Worker Node Status

  4. Check kubectl command in master node. Now, it will display more than 1 node (which is the includes all the installed worker nodes).

    kubectl get node

    Get Nodes Information using kubectl

⚠️ If you stuck in when starting k3s-agent. Make sure worker node and master node can be connecting. it could be firewall, proxy server, or incorrect/mismatched MTU. Script below can be use for check the connectivity.

curl -ks https://ipaddress:6443/ping

Install and Configure services in the Master Node

Because we disable some service in the master node. Now we are going to install it the replacement services.

HELM - Package Manager Installation

  1. Install Helm using script below (the latest script can be seen on the Helm docs):

    curl https://baltocdn.com/helm/signing.asc | gpg --dearmor | sudo tee /usr/share/keyrings/helm.gpg > /dev/null
    sudo apt-get install apt-transport-https --yes
    echo "deb [arch=$(dpkg --print-architecture) signed-by=/usr/share/keyrings/helm.gpg] https://baltocdn.com/helm/stable/debian/ all main" | sudo tee /etc/apt/sources.list.d/helm-stable-debian.list
    sudo apt-get update
    sudo apt-get install helm
  2. Check the version

    helm version

    Check Helm Version

MetalLB - Load Balancer Installation and Configuration

Load Balancer Diagram

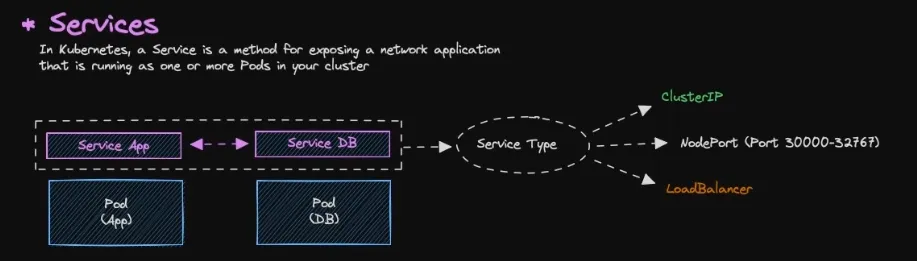
Services

  • As default, all resources in Kubernetes are isolated, specifically pods.
  • Pods are isolated by default. To enable communication between pods or with the external network, you need to configure Services.
  • There are several type of service:
    • ClusterIP → Default services, ClusterIP services provide an internal IP address within the cluster that other pods can use to communicate. They are not directly accessible from outside the cluster.
    • NodePort (Port 30000-32767) → NodePort services expose a port on each node in the cluster, allowing external access. The port range 30000-32767 is the default range.
    • LoadBalancer → LoadBalancer services provision an external load balancer that distributes traffic to multiple pods.

Installation Step by Step

  1. Add metallb repository to helm

    helm repo add metallb https://metallb.github.io/metallb
  2. Check the repo list

    helm repo ls
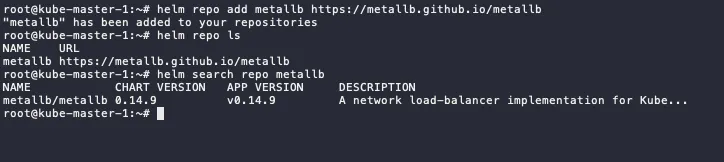
  3. Search the metallb

    helm search repo metallb

    Search MetalLB in Helm

  4. Pull the metallb from the repository, it will download tgz file.

    # run this in the home dir or other directory
    helm pull metallb/metallb
    # extract the tgz
    tar xvf metallb-*
  5. Change directory to metallb and if there any configuration changes, you can edit values.yaml

    cd metallb
    
    #optional
    vim values.yaml
  6. Install metallb using helm

    • Set the chart name to metallb
    • Define the file to values.yaml
    • Put the namespace to metallb-system
    • Enable debug mode
    • Create metallb-system namespace
    helm install metallb -f values.yaml . -n metallb-system --debug --create-namespace
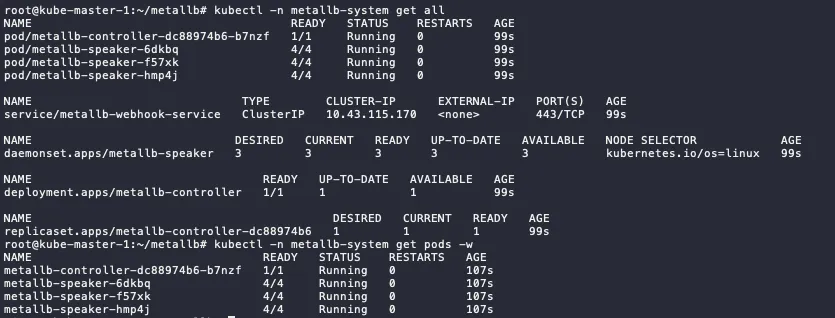
  7. Check the status, if the status still init, wait until running.

    kubectl -n metallb-system get all
    kubectl -n metallb-system get pod -w

    Get All using kubectl

Configuration

  1. First, define the address pool on ipaddresspool.yaml

    apiVersion: metallb.io/v1beta1
    kind: IPAddressPool
    metadata:
      name: default-pool
      namespace: metallb-system
    spec:
      addresses:
      - 10.0.2.11-10.0.2.100 #adjust this range
  2. Apply the configuration

    kubectl apply -f ipaddresspool.yaml

    Apply IP Address Pool using kubectl

  3. Then, we define the L2 Advertisement config on l2advertisement.yaml

    apiVersion: metallb.io/v1beta1
    kind: L2Advertisement
    metadata:
      name: default
      namespace: metallb-system
    spec:
      ipAddressPools:
      - default-pool
  4. Apply the configuration

    kubectl apply -f l2advertisement.yaml

    Apply L2 Advertisement using kubectl

Test the Load Balancer

  1. Run demo app for the testing, the demo app using nginx image.

    kubectl run app-demo-1 --image=nginx --port=80
    
    #check the pod status, wait until running
    kubectl get pod
  2. Since by default pod cannot communicate to outside, we need to create the service to expose the pods.

    kubectl expose pod app-demo-1 --type=LoadBalancer --target-port=80 --port=80 --name app-demo-1
    
    #check the pods and services
    kubectl get all

    Get All using kubectl

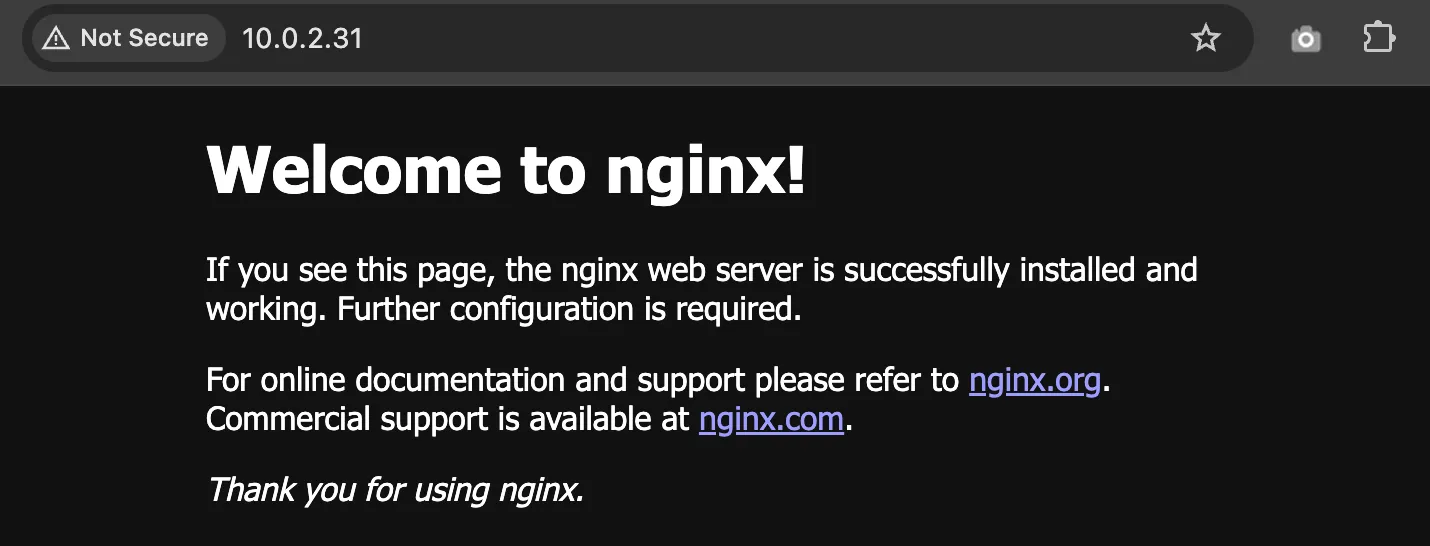
  3. You can access the app using EXTERNAL-IP of service/app-demo-1 and Nginx landing page will show up.

    Access External IP

Nginx - Ingress Controller Installation and Configuration

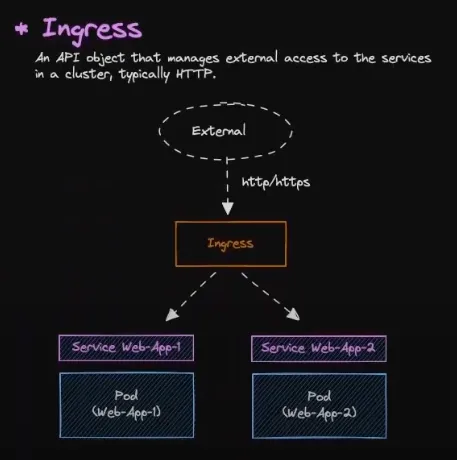
Ingress Diagram

Installation Step by Step

  1. Add nginx repository to helm

    helm repo add nginx-stable https://helm.nginx.com/stable
  2. Check the repo list

    helm repo ls
  3. Search the nginx

    helm search repo nginx
  4. Pull the nginx-ingress from the repository, it will download tgz file.

    # run this in the home dir or other directory
    helm pull nginx-stable/nginx-ingress
    # extract the tgz
    tar xvf nginx-ingress-*
  5. Change directory to nginx-ingress and edit values.yaml file.

    cd nginx-ingress
    
    # edit values.yaml
    vim values.yaml
    
    # locate ingressClass and change the variable below to true
    ...
    ingressClass:
    ...
    	setAsDefaultIngress: true
    ...
  6. Install nginx-ingress using helm

    helm -n ingress install nginx-ingress -f values.yaml . --debug --create-namespace
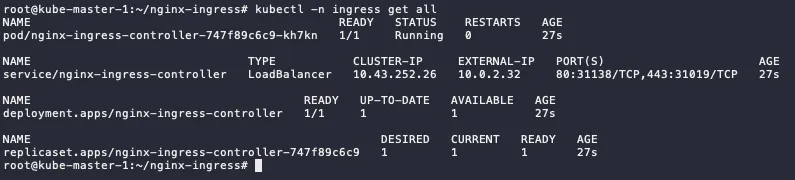
  7. Check the installation

    kubectl -n ingress get all

    Get All Ingress using kubectl

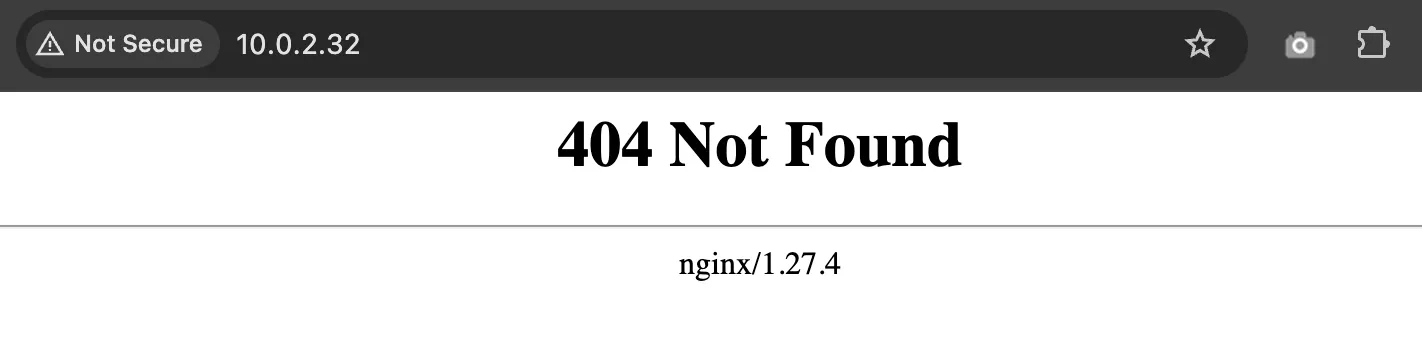
  8. The EXTERNAL-IP is available and reachable, but since no resources use it, it display 404

    Access External IP but Not Found

Testing the Ingress

  1. Add bitname repository to helm

    helm repo add bitnami https://charts.bitnami.com/bitnami
  2. Check the repo list

    helm repo ls
  3. Search the nginx, we will use bitnami/nginx for the webserver nginx

    helm search repo nginx
  4. Pull the nginx from the repository, it will download tgz file.

    # run this in the home dir or other directory
    helm pull bitnami/nginx
    # extract the tgz
    tar xvf nginx-* #make sure the nginx not nginx-ingress
  5. Change directory to metallb and edit values.yaml file.

    cd nginx
    
    # edit
    vim values.yaml
    
    #locate these variables
    ...
    ingress:
    	enabled: true
    	...
    	hostname: nginx.demo.local # make sure this FQDN is pointing to the ingress IP
    	...
    	ingressClassName: "nginx" # check using `kubectl get ingressclass`
    ...
  6. Install metallb using helm

    helm -n demo install demo-app -f values.yaml . --debug --create-namespace
  7. Check the status, if the status still init, wait until running.

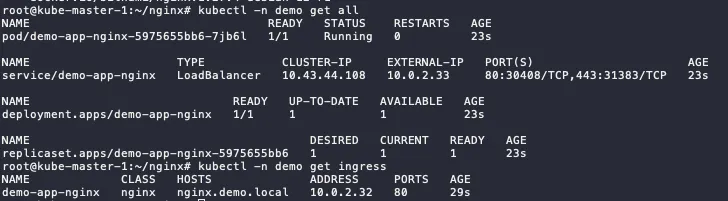
    kubectl -n demo get all
    kubectl -n demo get ingress

    Get All and Ingress using kubectl

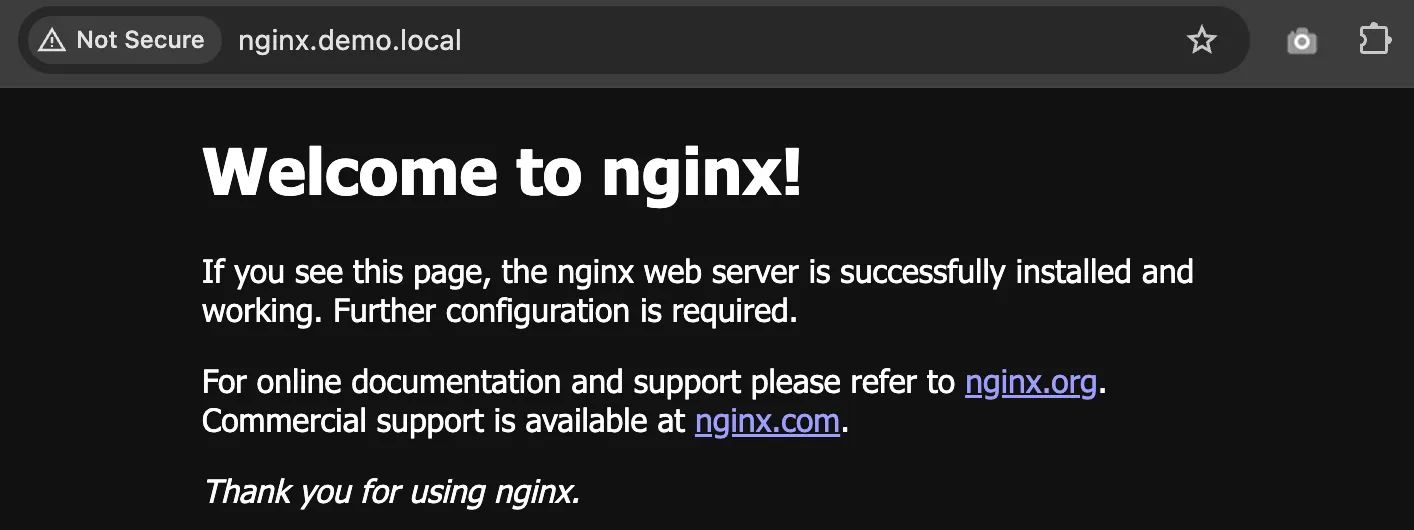
  8. If you configure the FQDN in DNS or /etc/hosts correctly to ingress IP address, it will show like this

    Access using FQDN

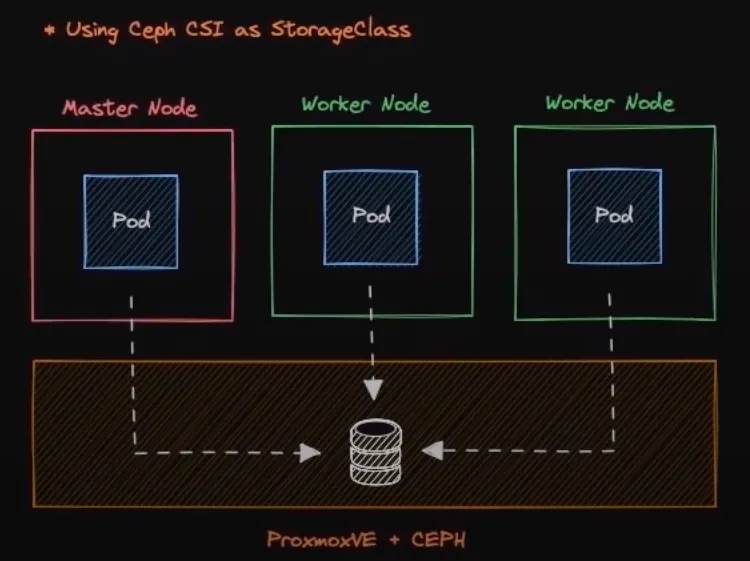
CEPH CSI - StorageClass Installation and Configuration

StorageClass Diagram

TODO - i don’t have CEPH cluster yet 🙈

Ketik untuk mencari…

↑↓ navigasi↵ pilihEsc tutup